door locks
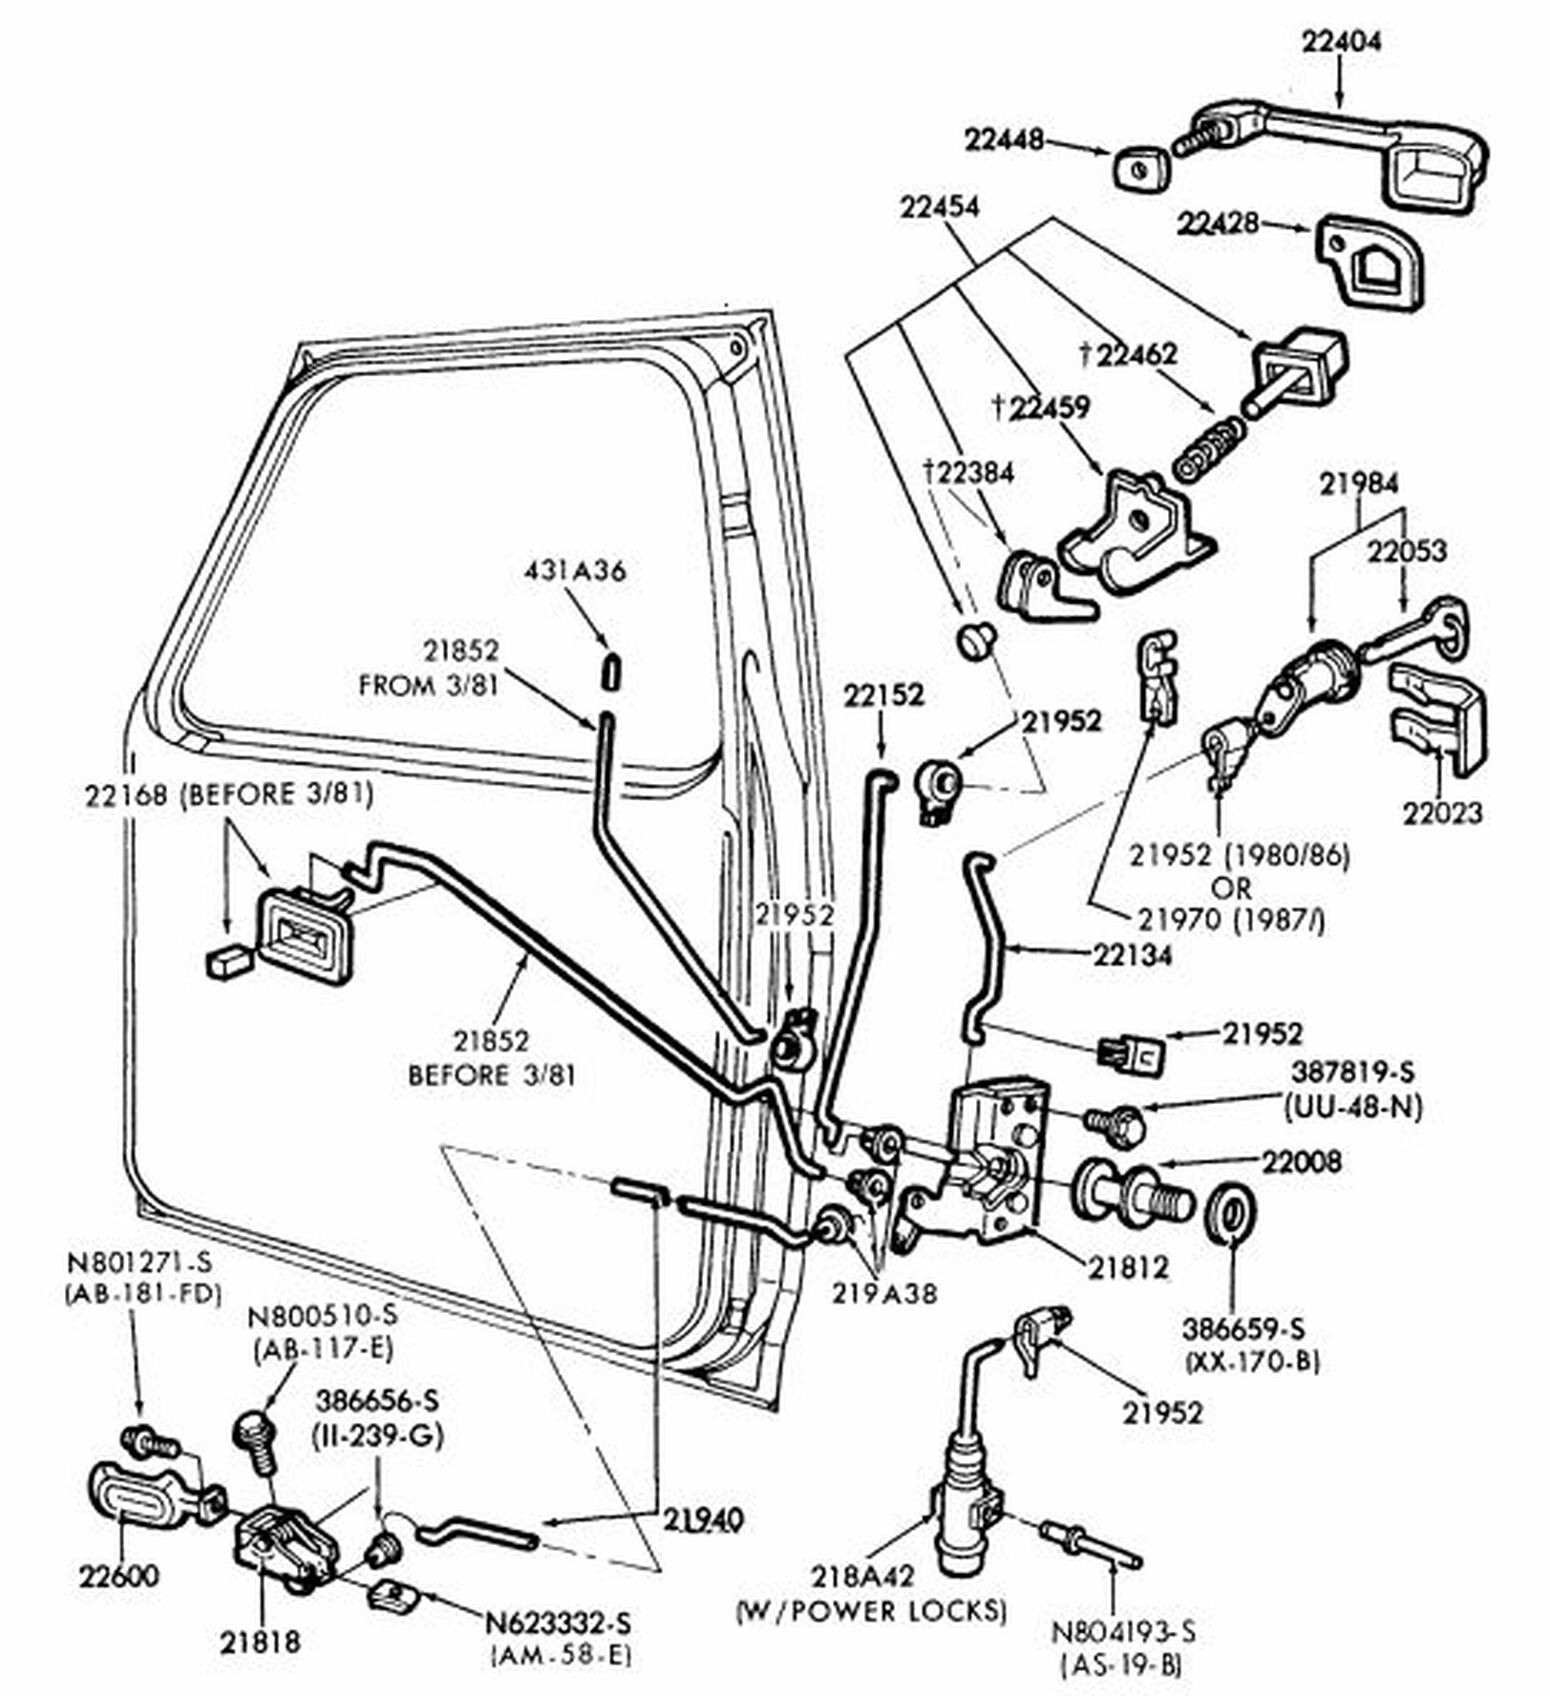
There were two types of locks and mechanisms for these trucks: Sliders and pin style. The 1980 & 81 trucks used sliders and took a different latch assembly, as shown on the Part Numbers tab. But, in the early part of 1981 Ford went back to the pin style that had been used for many years. The illustrations seem to say that the changeover was in March of '81. However, the changeover apparently wasn't as clean as that.
I think we can make several observations:
I think we can make several observations:
- The dates in the catalog are not exact.
- The turn signals changed much earlier than 12/80 in most plants. In fact, from what we can tell only Twin Cities and Norfolk used clear lenses for '81 trucks, although it is too early to say that with any certainty.
- The two trucks we know of which were produced in the Twin Cities plant in 09 of 1980 are separated by 442 trucks in the production, so apparently that plant changed to amber lenses in September somewhere between those two trucks
- The door locks changed fairly close to 03/81 in most plants, but not in all of them.
- Kansas City produced trucks in 03/81 with slide locks, but by 04/81 had gone to pins.
- Twin Cities was still using slide locks as late as 07/81.
By John Dolan, aka JohnnyD
Note: this procedure will also work for replacing a pin lock with a new latch; just skip the slider-specific steps. The first door took me 6 hrs to do, the second took 2-1/2 hrs. Hopefully with these directions you can start with 2-1/2 hr and do the second one in two. I know they are long and overly detailed, but it may give you some clues that will make the job much easier.
If you are really good, you can use this pdf copy of the Ford shop manual and ignore all this verbiage. Good luck!
Parts
1. 1 ea LMC* 49-7240 – Front Door Latch – LH (NOTE that this and RH are NOT compatible with slider-type locks, so it is necessary to convert the system to pin-type locks.)
2. 1 ea LMC 49-7241 – Front Door Latch – RH
3. 5 ea LMC 40-1362 – Retainer – Rod (optional)
4. 2 ea LMC 40-2748 – Latch Rod – Inner Lock – LH w/ Knob (pkg says this is an original Ford part E6TZ-152853-A). Knobs are silver plastic about ¼” diameter, bullet-shaped with tapered top, no knob to grip.
5. 1 ea LMC 40-2680 – Door Lock Knob Set – Black (pkg says Dorman #75407), includes 2 knobs + 2 bushings for door panel
*I chose LMC Truck parts – I’ve had good experience with them; parts are probably available elsewhere.
Background
You can read all the gory details in my earlier post, but here is the short version. The door latch on my passenger side was acting up. The door wouldn’t stay closed without slamming it hard, and even then it did not close flush with the truck (new weather stripping a year ago). Adjusting the striker pin did not solve the problem. In addition, the push button on the outside door handle didn’t open the door about half of the time and the key lock wasn’t working. As a shade tree mechanic friend of mine used to say, “That’s slap wore out!” Since the driver’s door seemed to be working, but probably had experienced 5-10 times the use over the last 40 years, I decided to replace both latch mechanisms. Complicating matters is the fact that my truck has slider type inside door locks. These are located on the inside door panel just above the door handle. From what I can gather these were only used on the 1981 trucks, and perhaps only on some of them (mine was built in Canada). It is now my belief that replacements for the slider locks don’t exist. Some vendors state their locks don’t work with sliders, but the guy at LMC Truck assured me that his book said theirs would, and they’d pay return shipping if they didn’t. But when I got to that point, I realized I was painted into a corner. Instead I ordered the pin latch rods and knobs (items 4 and 5 in the parts list) and convinced them that they were better off to give me free shipping on these than for me to send the latches back and shop elsewhere.
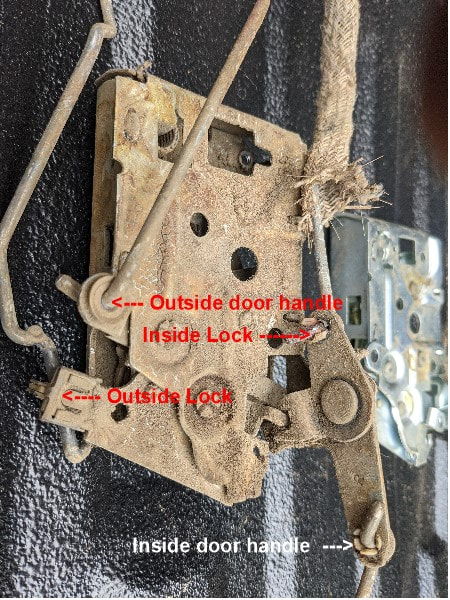
Indeed the latches I purchased were not slider-compatible. Here’s a comparison:
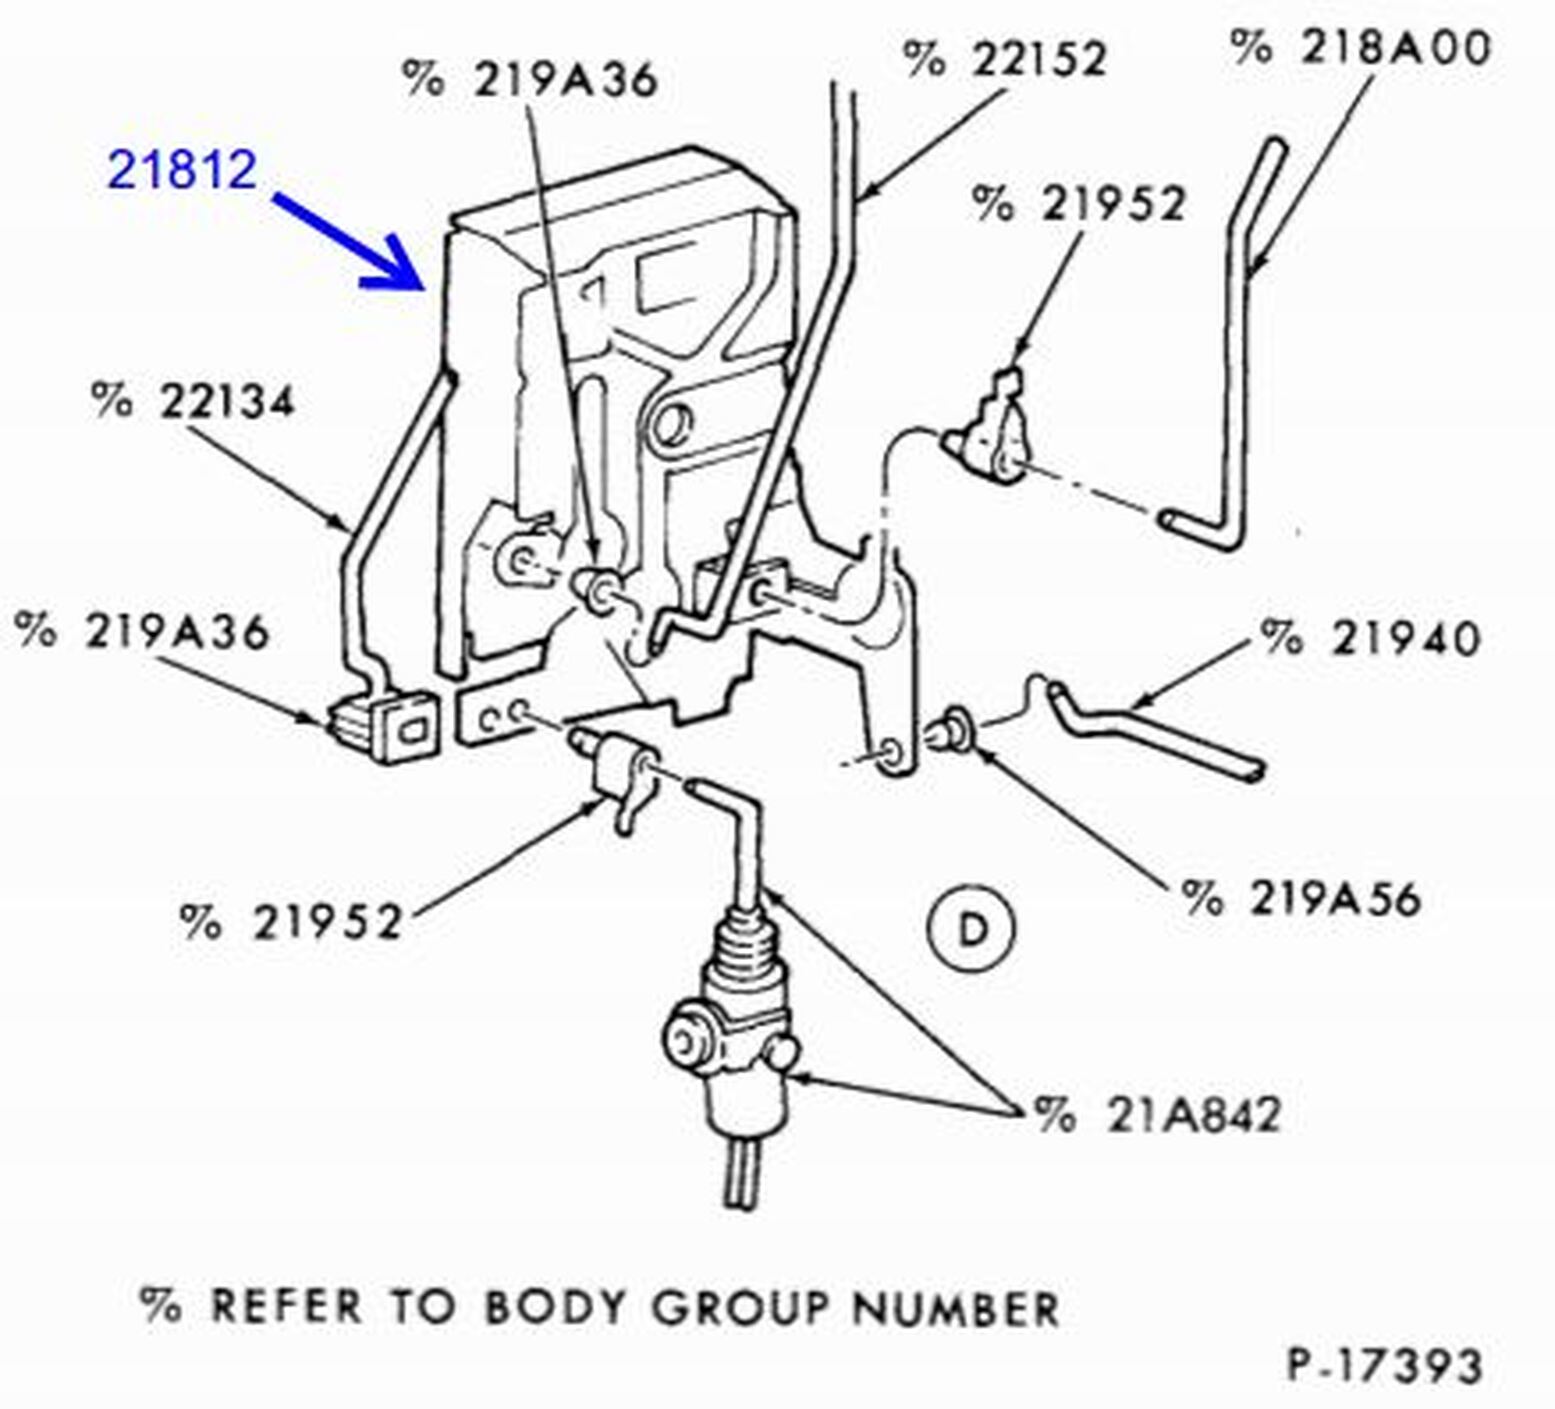
Figure 1 (and Figure 2) shows the forward side of the RH latch – remember that this fastens on the jam edge of the door, so it is like viewing the latch from inside the door facing the rear of the truck. On the left side, the rods going to the outside door handle and outside lock operate vertically, more or less in the position shown in Figure 1. On the right side of Figure 1, the top rod is the slider lock rod and the bottom one goes to the inside door handle. Both of these operate out of the photo toward you and slightly to the right, parallel to the windowsill and the door panel.
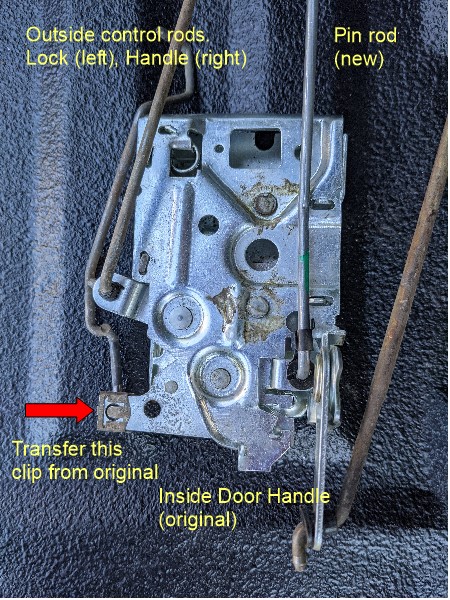
Figure 2 shows the LMC latch ready to install. Note that the outside control rods (left side of picture) and the inside door handle rod (right side) operate in the same way as the old lock in Figure 1. However, whereas the original has a pivot mechanism that moves parallel to the inside door panel, the new one has a pivot that moves parallel to the door jam, so it will not operate the slider latch. Thus, the new pin-type latch uses a rod that goes up to the knob on the windowsill. Note that the clip that secures the lower end of the key lock rod is not included on the new latch, so you need to transfer it from the old one.
Disassembly
Before you start, I suggest putting on a long-sleeved shirt. I did not do this and my arms are covered with scratches and cuts from the sharp edges on the door.
1. Remove the window crank.
2. Remove the inside door handle. This isn’t absolutely necessary, but makes the job easier. If you partially open the handle, you can get a socket on the bolt and get it off more quickly than using an open-end wrench with the handle in its normal position. Also don't forget to remove the screw in the bottom of the pocket in the elbow rest.
3. Remove the inside door panel (plastic). This is held on with those heinous plastic fasteners that break with age, so you might add some of these to your shopping list if you don’t have spares (I replaced the panel recently, so mine were new). Use a putty knife to pry the panel off. Be sure to note the position of the spring behind the panel that pushes against the window crank.
4. Once the panel is loose, you’ll need to pop the slider mechanism out of the panel. Pinch the metal edges of the slider from the back side of the panel and it should pop out the front side of the panel. Carefully rotate the slider to free up the end of the control rod. When it is loose, you can pop the slider back in the panel – it is now a cosmetic curiosity that will serve for useful conversations on long trips…
5. The panel should be free now; set it aside.
6. Peel the paper or plastic water shield from the inside of the door. If it is in good shape, just the back half needs to be peeled back. My original was paper and self-destructed. I used it as a template to trace on a heavy piece of plastic sheeting for the replacement, held in place with masking tape.
7. Now you should be able to remove the remainder of the inside door handle mechanism (one bolt) and twist it around to release the control rod. I had to hold the end of the rod with pliers and twist the mechanism around to wrestle it out. Set the mechanism aside.
8. Remove the weatherstrip from the channel below the back edge of the window (window should be up); stuff the end somewhere to hold it out of your way. Remove the lower rear weatherstrip channel; this is held by one bolt on the lower part of the door panel near the rear, the top slides in place. Note that this step is not called for in the factory service manual, but I spent too much time trying to remove anything else with this in the way.
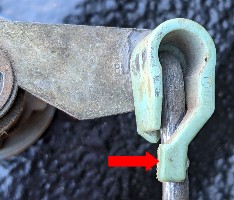
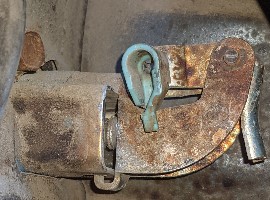
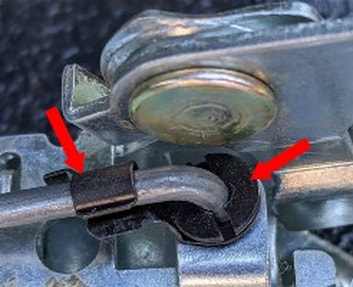
9. Unclip control rods from outside key lock and outside door handle. These can be tricky to release in the confines of the door, especially if you have big, clumsy fingers like mine. Figure 3 shows one of the retainers with the door rod in place (this is the one on the key lock). Push the bottom tab to the right and while it is clear of the rod, pull the rod loose. I found that a small flat-blade screwdriver was better than bare fingers for this task. Figure 4 shows the door handle after the rod was pulled out.
|
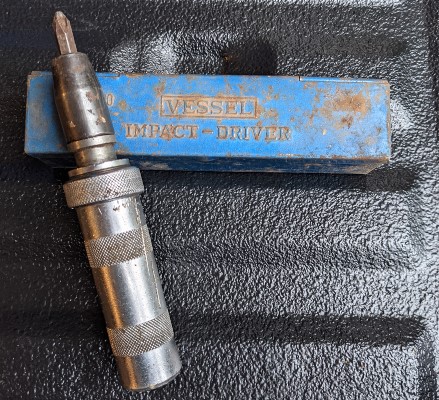
10. Remove latch mechanism. If you’ve disconnected everything properly, the latch should be ready to come out. It is held in by three large countersunk screws accessible on the rear outside edge of the door. These screws are secured with rust and/or paint, so they need some convincing to come loose. My favorite tool is the hand-operated impact driver; Figure 5 shows the one I bought in my VW bus days, but you can get one from Harbor Freight if you don’t have one. Put the large Phillips bit in it, put it in a screw and with your big hammer whack on it until something gives. I prefer this approach over an air-powered impact wrench, because the pounding force ensures that the blade will not slip and strip out the screw head. Save the screws, especially if they are painted, so you can make things pretty when you reassemble. At this point you should be able to fish the latch with the rods out through one of the access holes in the door.
|
Intermediate steps
11. If you haven’t done this yet, a pause for an adult beverage might be appropriate about now, as you contemplate your bleeding knuckles and sliced arms.
11. If you haven’t done this yet, a pause for an adult beverage might be appropriate about now, as you contemplate your bleeding knuckles and sliced arms.
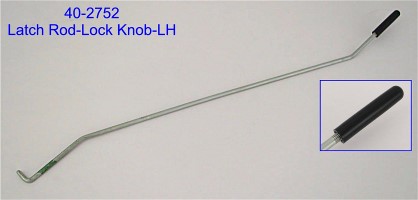
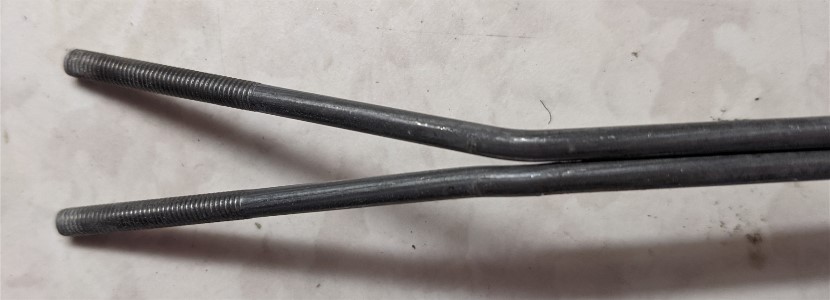
12. I could only get LH pin rods from LMC, so I had to adjust these. Figure 6 shows the stock LH rod; note the right end is bent up with the rest flat on the surface; for use, the RH one needs to be bent the opposite direction. IMPORTANT – label the original with a tape label (LH) and the one you are working on (RH) so you install them in the proper latch! I found that these bent easily by holding the main shaft in a vice, slipping a piece of metal tubing over the end to protect the threads, then bending the tip with a pair of channel locks. The finished product is shown in Figure 7a – there is lots of slop in the mechanism, so this doesn’t have to be perfect.
13. Set the new and old latches side-by-side and transfer the parts one at a time so you don’t mix them up. Might be a good idea to take some photos with your phone, just in case. Obviously, you use the pin rod instead of the slider rod.
14. Remove the retainer for the key lock rod from the old latch and move it to the new one (see Figure 2).
|
15. I used new rod retainers (item 3 in the parts) on the latch mechanism for the other rods, as shown in Figure 7b. Oddly enough, one latch came with retainers installed and the other was bare. These are designed to use with a rod with an L-shaped bend it the end. Only the new pin rod has this kind of end, and relies on the keeper clip to hold it in place (I had to pinch the clip a little to make it snug). The inside and outside door handle rods have S-shaped ends that have to twist and thread through the plastic. For the retainers I bought, the retainers had to be pushed through from the opposite side from the rod so the top of the T is at the tip of the rod in the final assembly – see Figure 2. This allows the rod to rotate properly. I also did not use the keeper clip on these.
|
16. Once all the rods have been transferred, they should look like that of Figure 2 (note, we’re looking at the passenger side latches; the driver side will be flipped right-to-left).
17. Now is a good time to squirt some silicone or WD-40 up inside the door to lube the inner parts of the outside key lock and door handle. Ditto for the inside door latch mechanism. A little graphite in the key lock is probably due, too.
17. Now is a good time to squirt some silicone or WD-40 up inside the door to lube the inner parts of the outside key lock and door handle. Ditto for the inside door latch mechanism. A little graphite in the key lock is probably due, too.
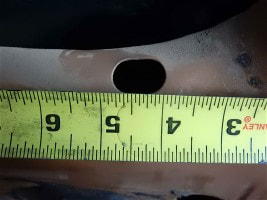
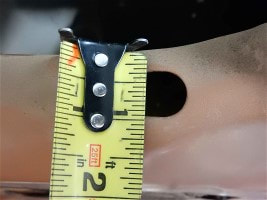
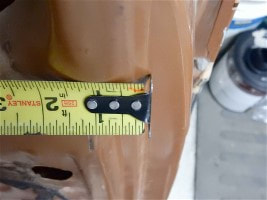
Figs 8a-c – Pin lock hole position on door
|
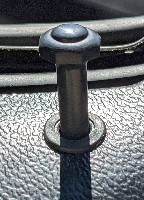
18. Now it is time to drill a hole in the door sill for the pin rod to pass through. See Figure 8a-c for Gary’s helpful photos of how the hole should be positioned in the door. You can get the measurements from the photos. The hole is oval and 5/8” wide x ¾” long.
|
|
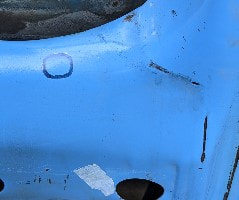
19. I did my best to locate the hole and marked it with a felt marker (Figure 9). I ended up drilling a ¼” hole in the middle of this, then used a side-cutting Dremel tool to cut out the hole. I didn’t use my pneumatic nibbler, because it required a bigger hole to get access, but you might be able to do this with a hand-operated one
|
|
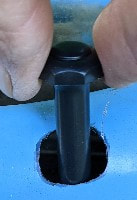
20. Once the hole was complete, I tested it for clearance with the pin lock knob (Figure 10). If I was going to do this again, I would drill the pilot hole in the plastic door panel first to locate the pin, then extend the bit or a thin punch through the hole and mark the center of the hole to cut in the door. You can see that this first try worked perfectly, but on the other door, I didn’t line the two holes up exactly and had to make the hole in the door larger (no photos – it was ugly). This is no big deal, since it is hidden behind the inner panel, but it could have been avoided if I drilled a pilot hole first. When I finished drilling, I used a magnetic pickup tool to remove all the drill shards from the bottom of the door.
|
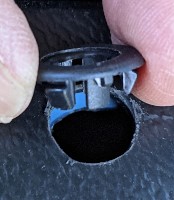
21. Next, locate the center of the hole you drilled in Figure 10, temporarily mount the inner door panel, and locate the pin lock hole. I drilled an 1/8” hole and poked down to see if it lined up with the inner hole. Then I enlarged the hold with a ½” bit. The grommet was slightly larger than ½” clearance, so I enlarged the hole with a hand reamer (I didn’t have a larger bit). You can see in Figure 11 that the grommet has 3 barbed clips (two visible) that hold it in place once inserted. Unfortunately, the notch in the clips was smaller than the thickness of the door panel, so I used a 120 grit sanding drum on my Dremel tool to carefully make the back side of the panel thin enough that the grommet snapped in properly. Inserting the knob through the grommet helped to maneuver it into position.
Reassembly
At this point, everything should be ready for reassembly. Good time for another cold one.
22. Reinstall the door latch. You’ll have to have about a dozen hands, but it can be done. I suggest reusing the original screws if they are compatible, especially if you’ve repainted your truck and the screws match the paint. I found that the LH latch was compatible with the old screws, but the RH one had a different thread pitch, so I used the supplied screws. At this point, don’t use any LokTite in case you have to pull it out. Before screwing anything into place, you’ll need to feed the pin rod through the hole; if you thread the knob on it, it will help suspend the latch while you maneuver everything else into position. If possible, get the outside door latch rod and the key lock rod in approximately the right position. The inner door rod should be in a position that you can reattach it to the handle mechanism. Now put in the three screws to hold the latch in place.
23. Reattach the inner door handle mechanism. I was able to get the rod end back in the mechanism using the original bushing, but you may need to replace it with one from those you bought from parts list item 3. Screw the mechanism to the door; note that there is a tab at the opposite end from the screw that needs to fit in first. If you haven’t done so already, lubricate the mechanism.
24. Reattach the inner door handle. You may want to put a drop of lube on the threads, because you are likely to have this off and on a couple times before you are satisfied with everything.
25. Reattach the upper ends of the outer door handle rod and the key lock rod. Refer to Figures 2 and 3 to see how the retainers work. I found I could push the bottom lever to the right, shove the L-shaped rod end in place, and then help the bottom lever back into the “keeper” position if it doesn’t snap back by itself. If you broke one of these taking the rods out, you would wish by now you had replaced the retainers before you put the latch in place – good luck with this! Figure 7b shows how the new retainer clips that I bought work.
26. Screw the pin knob temporarily on the pin lock control rod if you didn't do it earlier.
27. Test EVERYTHING. Roll the window down so you don’t lock yourself out. Push the pin down; make sure you can unlock the door by pulling the inside handle and by using the outside key lock. Use the outside key lock and make sure you can open from the inside. Use the key lock, push the outside door handle to be sure the door was locked, then use the key lock to unlock the door. Test all the combinations you can think of. If something doesn’t work, it is probably because one of the rods is binding somewhere; track it down and fix it.
|
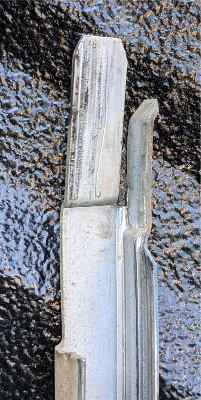
28. Prepare to reinstall the lower weatherstripping channel. Here’s where I went wrong and probably added an hour or more to the project. Note that the upper end of the lower weatherstrip channel should look similar to Figure 12. If you bent the wide tab when you pulled it out, bend it so it bent slightly inward from the rest of the channel. This wide tab MUST go inside the top channel (toward the front of the door); the smaller tab (right side of the top of Figure 12) goes outside the top channel. If the wide tab goes behind the top channel (which is where it went when I first reassembled it), the door latch won’t work properly – not enough clearance.
Pull enough of the weatherstripping out of the upper channel that you can clearly see where the two sections overlap. To do this, I had to pull the weatherstrip to one side with the window down and “derail” the window off the weatherstripping as I rolled the window up. |
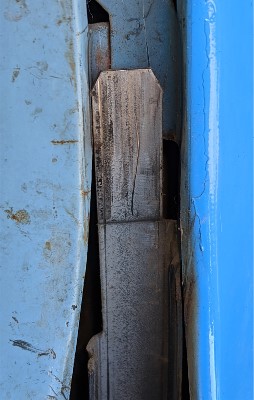
29. Reinstall lower weatherstrip channel. With the window up, carefully insert the upper end of the lower channel so it is in front of the upper channel, as shown in Figure 13. The smaller tab should be on the outside of the upper channel (to the right out of sight in Figure 13). Fasten the lower end of the channel in place with the original bolt.
30. Replace the weatherstrip in the channel. I found that I could pull it back to approximately the right position, then roll the window down to put the glass back in the groove. Some up and down moves, plus a little help with a plastic putty knife got the weatherstrip so it was back where it belonged. Test this by rolling the window up and down a couple times to make sure everything looks good. If you haven’t lubed the window crank gear mechanism in a while, now is a good time to do this.
31. Test EVERYTHING. Repeat step #27 above. I found that the soft spot in the whole business was that I could use the key lock to lock and unlock the outside door fine and everything on the inside worked fine. But if I locked the key and pressed the outside button, I could not unlock it from the outside. You can imagine the scenario when you go to your favorite auto parts store and lock the truck. Then you come back out and push the button and realize you locked the door, but the key won’t open it. Time for the Slim Jim… I only had problems when I had the lower weatherstrip channel installed improperly; when it was fixed, everything worked fine.
32. Once everything works properly, you can reinstall the inside door panel. First, pull the original watershield back in place and tape it where it belongs or replace it with the new one you fabricated.
33. Reinstall the inside door panel. I found that I could get it back on with the inner door handle installed if I pulled the handle part way open and wiggled things around. Don’t forget to put that big spring behind over the window crank mechanism. After you’ve popped the panel on and then taken it off a few times to put on the retaining studs that fell out at the last minute, it should fit nicely. Fasten on the window crank (mine has a plastic washer behind it). And don't forget that nasty screw in the bottom of the pocket on the elbow pad.
34. Secure the three latch screws. Remember those three screws in the door jam? Take one out, put a drop of blue LokTite on the threads and screw it back in securely, then the next one and then the third. The LokTite will hold them until rust fixes them permanently in place.
|
35. Now you should be finished. All this for the simple ability to lock and unlock the door with a pin on the doorsill (Figure 14) like normal people do. (Well, I had a nonfunctional latch, too.) You may need to adjust the striker in the rear part of the door jam to make the door fit flush with the body of the truck. Yeah!
36. Extra parts? What, did you find a couple parts in your bucket after you finished? Just put them in that spare parts box and maybe next time you’ll find where they went. I remember one caller to “Click and Clack’s CarTalk” radio show on NPR. He asked how many times you had to rebuild a carburator before you had enough parts to make a new one.... |

