
bullnose forum faq's
Before getting into the FAQ's, let me just say that ad block software, like AdBlock, tend to hide the signatures on the forum. So, since we don't have ad's then why not turn your ad blocking program off for the whole of the Garagemahal?
|
|
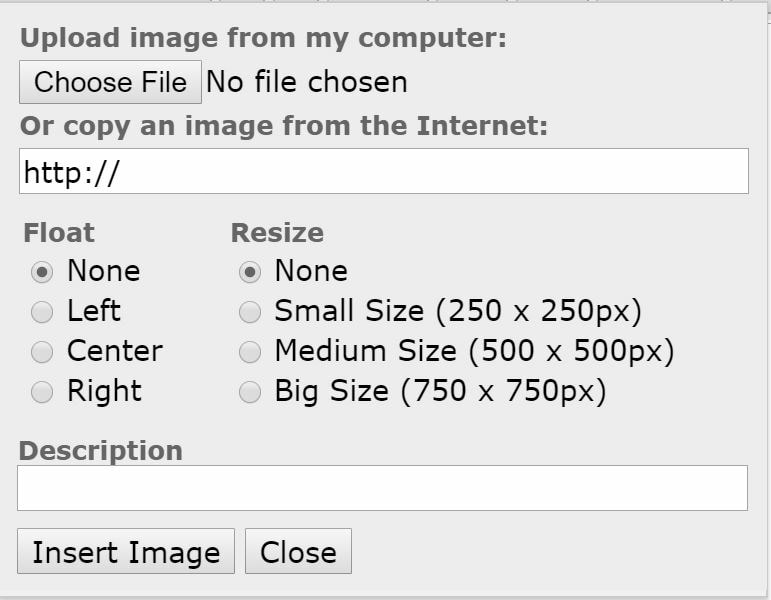
When you click "Insert Image" there is a progress indicator in the lower left of your browser's window that shows that the upload is taking place, so depending on the speed of your connection and the size of the file it may take up to half a minute to make the upload. Once the upload is complete the dialogue will disappear and you will see a link in the form: <nabble_img src="myphoto.jpg" border="0" class="center"/> inserted in the message where the image will appear when posted.
However, you may get an error message that says "Upload failed: Image is too large". That's because the max file size is 1.0MB. In that case you need to re-size your pic, as explained below.
IMAGE SIZE: Nabble offers four sizes of picture in the Insert Image dialogue. The default is None, which can only be used on files smaller than 1.0Mb. If your file is larger than that you'll either have to resize the pic yourself or use one of the other three options. The largest (750px) nicely fills the width available in the forum. For most purposes, this is the best option to use, and should be used in conjunction with the "Float: Center" option (as described in IMAGE POSITIONING, below).
The smaller sizes (250px and 500px) are best suited for images to be floated left or right.
Images wider than 750px will be truncated and only show the left hand part, so you should always choose one of the three sizes above unless the file you are uploading, or linking to, is already below this limit.
If you wish those reading your post to have a copy available for best print quality then use the file upload facility (on the "MORE" menu) rather than adding it as image. This allows links files of up to 5Mb in size to be uploaded. The file will appear as a link in your message. Readers will be able to right-click on it and choose the option to save it to disk.
IMAGE POSITIONING: Some people have said they find it difficult to get the image to go where they want it. The following may help you understand how to position an image. This follows the standard HTML rules. (HTML is the computer language used to build web pages.)
- By default, images appear "in line". (The "Float: None" Setting)
When inserted, an image behaves just like the next letter typed in a word. Obviously it will be much taller than a normal letter so forces the lines of text apart in order to accommodate itself and it will cause word wrapping if it is so wide it would go beyond the end of the line. If using the default positioning, it is recommended that you hit the carriage return/enter key a couple of times before and after inserting any image to ensure that the image starts on a new line and no text will continue from the bottom right corner of the image. - Images can be set to "float" (The Float: Left/Right Setting)
Floating takes an image out of the "normal flow" (to use HTML jargon). It appears to the left or right at the position it was inserted. Any following text then fills the space to the side of floated image and otherwise continues in the normal flow of the page's content.
In general, therefore, it is recommended NOT to use "Float Left/Right" unless the image is to be displayed at one of the smaller sizes offered and a good quantity of text follows the image. There needs to be sufficient text flowing beside the image to reach fully past the image and return to occupy the full width of the space available. If it doesn't, then any following images can begin to catch on the earlier ones and it all gets very messy.
But you can easily put two pics side-by-side in a post. To do that simply insert one to "float left" and the other to "float right", and use the "float right" setting. But, you might want to then stick in width="48%" to get them to be the max size they can be so your text doesn't try to squeeze between them.
- Images can be displayed centered (The "Float: Center" Setting)
In HTML terms the image is being displayed as a "Block" and that block is then centered within the space available. As a block nothing can be displayed or flow to either side of it. This is probably the best setting for most people to use. Text before the image will stop as if the end of a paragraph. Following text will start on a new line. However, note that images which are wider than the available space will be truncated and only show the left hand portion.
You can subscribe to get email notifications, either individual emails or rolled-up summaries for the day, and you can do so at any level. I've subscribed at the top level and get individual emails for every post, but you can subscribe to any and all of the forums.
Let's say you are interested in any posts that are made in the folder/thread called Projects. Open that thread/folder and on the left side you'll see an Options selection, and within that a Subscribe Via Email option. If you click that you can sign up for that thread/folder. Or, you can do the same any of the threads/topics in that folder and get notifications for any post made in it. Or, as I've done, do so at the Bullnose Forum level and you'll get notifications for anything that goes on.
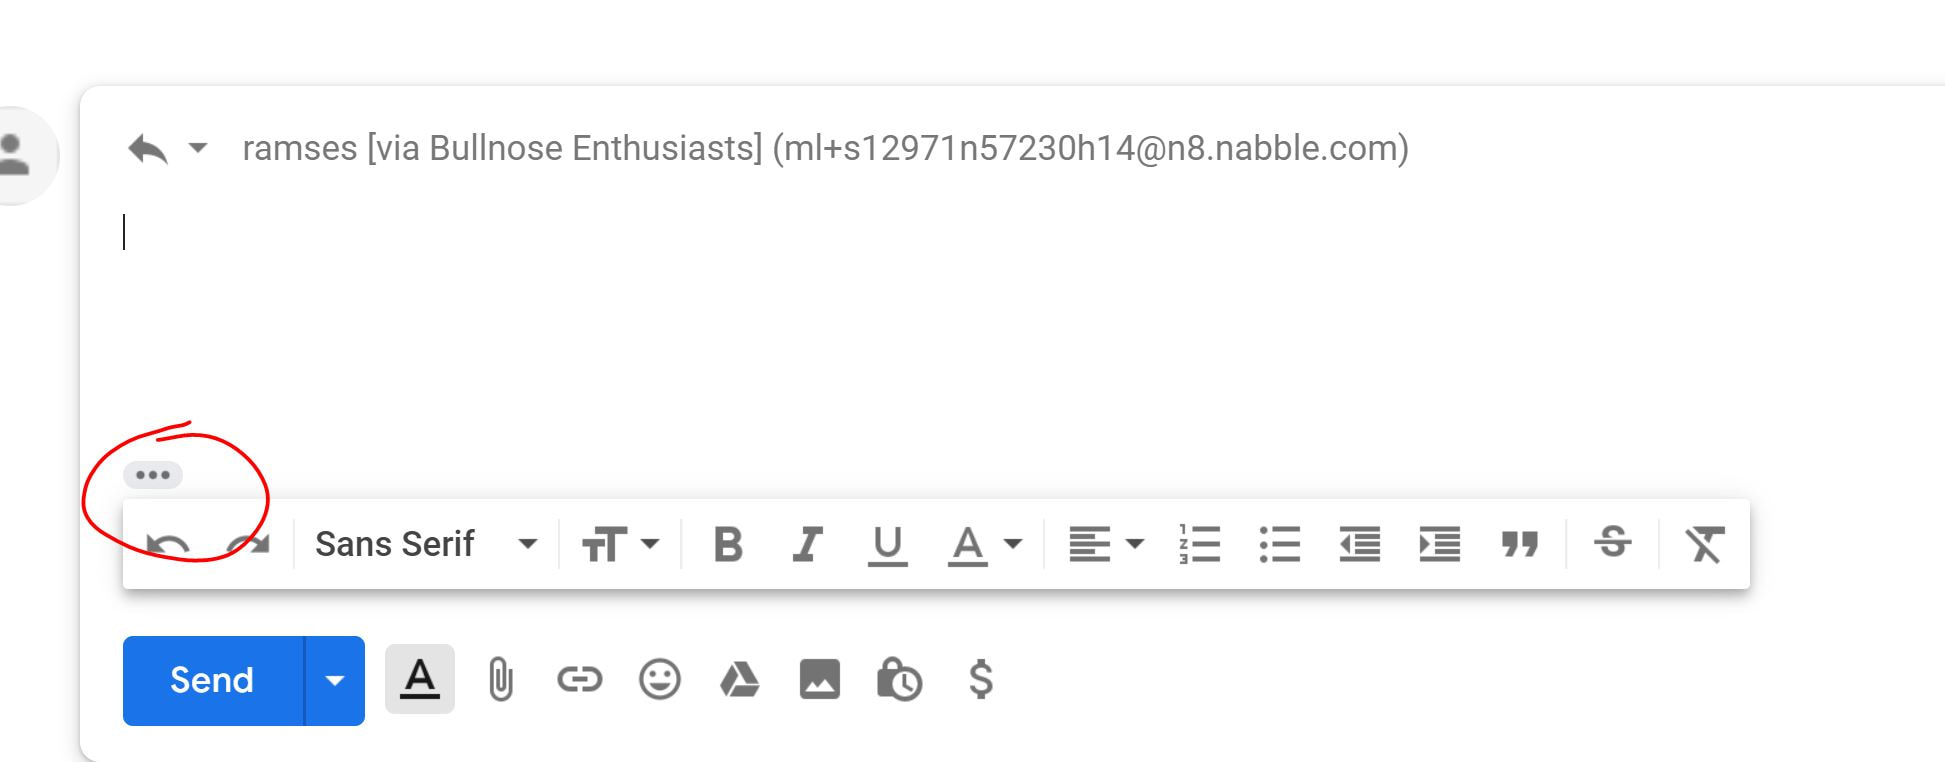
In addition, you can respond to the email notifications and that creates a post in that topic on the forum. And that gives you much greater formatting capabilities as most email applications allow you to do bulleted lists, numbered lists, underlining, larger/smaller fonts, etc. HOWEVER, if you do that w/o deleting the baggage your post will bring with it much of the post to which you are replying. But, if you click the three dots at the bottom of your screen, as shown below, you'll see all of that baggage and you can then select it and delete it.
Let's say you are interested in any posts that are made in the folder/thread called Projects. Open that thread/folder and on the left side you'll see an Options selection, and within that a Subscribe Via Email option. If you click that you can sign up for that thread/folder. Or, you can do the same any of the threads/topics in that folder and get notifications for any post made in it. Or, as I've done, do so at the Bullnose Forum level and you'll get notifications for anything that goes on.
In addition, you can respond to the email notifications and that creates a post in that topic on the forum. And that gives you much greater formatting capabilities as most email applications allow you to do bulleted lists, numbered lists, underlining, larger/smaller fonts, etc. HOWEVER, if you do that w/o deleting the baggage your post will bring with it much of the post to which you are replying. But, if you click the three dots at the bottom of your screen, as shown below, you'll see all of that baggage and you can then select it and delete it.
If you want a bulletted list you can click the H2 drop-down button and then select H6 and it will insert the HTML code to give you a bullet. The code looks like "< h6>< /h6>" w/o the space right after the "<". And if you put your cursor between the > and < then whatever you type will be set off by a bullet. For instance, if I do this "< h6>This is a test< /h6>" but without the extra spaces you get
And then there's indentation. Clicking the H5 selection does that for you. Again it drops in code that looks like "< h5>< /h5>" but w/o the extra spaces, and anything you type between the two arrows gets indented. So, if I type < h5>This is a test.< /h5> it'll give you
This is a test.
Similarly, H4 gives you This is a test. (Normal-sized bold text)
And H3 gives you This is a test. (Bigger italics)
And H2 gives you This is a test.
And H1 gives you This is a test., although you have to type in the 1 as there doesn't seem to be a button for that.
But, that list doesn't include color fonts. Here's what works to give red a red font: <span style="color: rgb(255, 0, 0);">Put your text here</span>. Or you can make it 0, 255, 0 to give green, or 0, 0, 255 to give blue. Or, anything in between.
And if you want an "ordered list", meaning that it has numbers, then:
<ol>
<li>Test</li>
<li>Testing</li>
</ol>
Gives:
But, if you want an "unordered list, meaning it has bullets:
<ul>
<li>Test</li>
<li>Testing</li>
</ul>
Gives:
- This is a test.
And then there's indentation. Clicking the H5 selection does that for you. Again it drops in code that looks like "< h5>< /h5>" but w/o the extra spaces, and anything you type between the two arrows gets indented. So, if I type < h5>This is a test.< /h5> it'll give you
This is a test.
Similarly, H4 gives you This is a test. (Normal-sized bold text)
And H3 gives you This is a test. (Bigger italics)
And H2 gives you This is a test.
And H1 gives you This is a test., although you have to type in the 1 as there doesn't seem to be a button for that.
But, that list doesn't include color fonts. Here's what works to give red a red font: <span style="color: rgb(255, 0, 0);">Put your text here</span>. Or you can make it 0, 255, 0 to give green, or 0, 0, 255 to give blue. Or, anything in between.
And if you want an "ordered list", meaning that it has numbers, then:
<ol>
<li>Test</li>
<li>Testing</li>
</ol>
Gives:
- Test
- Testing
But, if you want an "unordered list, meaning it has bullets:
<ul>
<li>Test</li>
<li>Testing</li>
</ul>
Gives:
- Test
- Testing
There are times it is helpful to "embed" things in a post. That means that you put something in a post that actually resides elsewhere. For instance you might embed a Youtube video, a spreadsheet, or a Word or PDF document. And there are two ways to embed things:
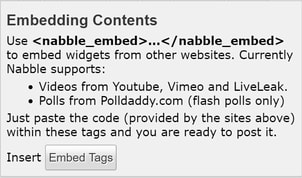
- Embed function: There's an Embed option on the menu bar above the editing field called "Embed". But that function can only be used for some video and polls. See below for how to use it.
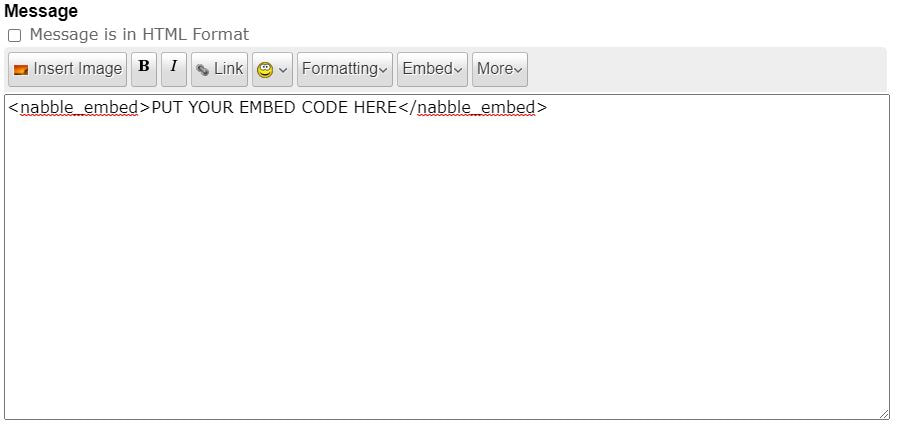
- HTML tags: The more capable way to embed things is to tick the box marked "Message is in HTML Format" above the editing field and use HTML tags, as described below.
|
On the menu bar above the editing field there is a button called "Embed". If you click it you'll get the pop-up menu to the right. As you can see, you can embed videos from one of three sources or a poll.
|
|
|
To embed one of those things you need to get the "embed code" from, say, Youtube, click the Embed Tags button, and paste the code between the ">" and the "<" characters that appear. Then hit Preview and you should have the video.
|
|
But, there are other sources of videos, and even other file types, that you might want to embed in your post. And to do that you need to do some HTML work.
The first thing to do is to tick the box in the upper left of your editing window that says "Message is in HTML Format", as shown above. And then you can paste any HTML coding into your post. However, when you do you will need to use more HTML code to make things look like you want them.
HTML Tags:
If you do tick the HTML box you'll soon discover that your text is all in one paragraph and that no amount of hitting Enter will break things up. But, that can be solved by inserting some HTML tags. For instance, place a paragraph tag (<p>) where you want the line spacing to be. (Yes, technically you are supposed to have an ending (</p>) after the paragraph, but omitting that doesn't seem to cause a problem.) And, if you want to get fancy you certainly can. Here's a link to a list of HTML codes, and you can really be creative if you want with them.
Embedding A File:
Let's say that you want to embed a file in a post so you can keep track of your build. An example of that would be the first post in my thread called Dad's Truck Build, where I have created a Word document and embedded it. That allows me to edit the file behind the scenes as things progress. And, it gives me a good place to save links to the various posts in threads across the internet that have things in them relevant to Dad's truck.
So, how did I do it? As said, I created a Word file. But, you could use a spreadsheet, or a Powerpoint, or a PDF. (I'm sure there are other files that can be embedded, but these are the ones I know can be done.) And then you have to host/save the file on an online, or "cloud", service. In my case I use Onedrive, but a Google drive can be used as well. Here's how:
|
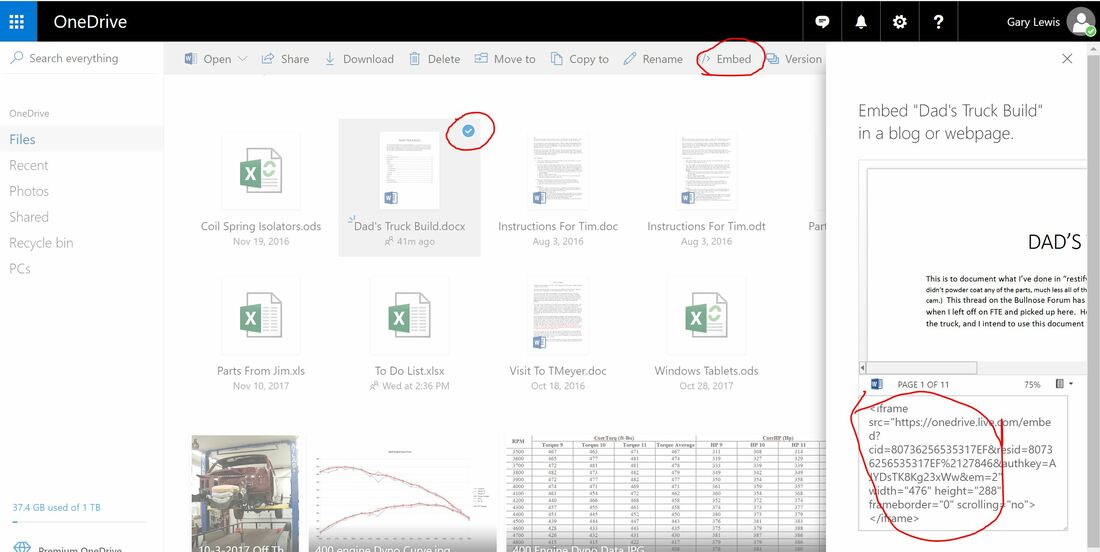
Onedrive: Go to your Onedrive using a browser and you'll see a window like the one to the right. (You can click that pic to make it bigger.) Tick the button on the file you wish to embed, click Embed on the tool bar, and you'll get a sidebar like the one to the right in that pic. There will be a Generate button, and if you push that you'll get a set of code like is shown in the bottom right of the pic. Copy it - all of it.
|
|
|
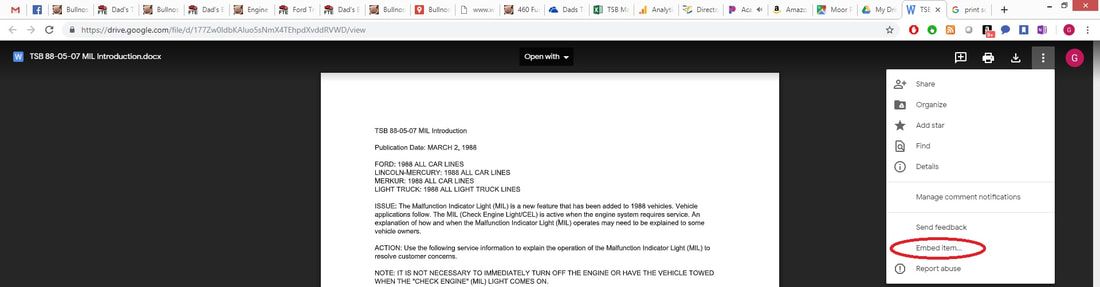
Google Drive: Open the file from your Google Drive using a browser. In the upper right corner you'll see three dots, and if you click them you'll see the little menu that shows on the right. Click the option to "Open in a new window".
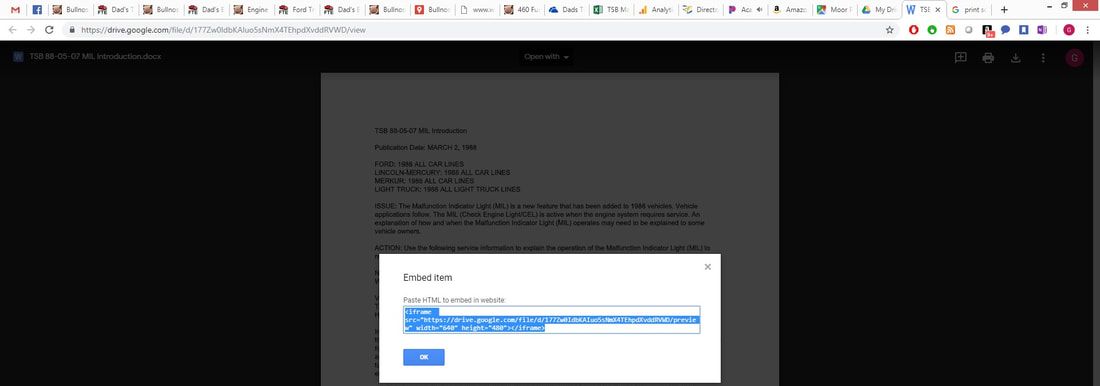
Then you'll see the same file and you'll have 3 more dots in the upper right, and if you click them you'll get another little menu with an option to "Embed item". And now you'll have this window pop up and it will have the "iframe" code that you need. As shown to the right, highlight all of that code and press Control C to copy it to the clipboard. |

|
Embed:
Now that you have the code to embed, go back to your post on the forum, tick the "Message is in HTML Format" box, and paste that code into the editing window. Hit "Preview" and you'll see your document materialize. However, it'll probably come up small, and if so I would edit the code slightly. You'll see a "width=" and a "height=" statement. I make mine say width="100%" height="1060", and now if you hit Preview you'll see the document in a larger size.
Now that you have the code to embed, go back to your post on the forum, tick the "Message is in HTML Format" box, and paste that code into the editing window. Hit "Preview" and you'll see your document materialize. However, it'll probably come up small, and if so I would edit the code slightly. You'll see a "width=" and a "height=" statement. I make mine say width="100%" height="1060", and now if you hit Preview you'll see the document in a larger size.
You can just paste the embed code you got from Youtube in the post after ticking the HTML box, and that will work but it doesn't provide a full-width video. However, you can add some HTML code and make your video show up as full-screen for most viewers.
Let's take the following example. The code below is what I put in this post that embedded the Youtube video as full screen. Note that the black text is the original Youtube embed code with the exceptions of the width and height, the red text is what I added, and the green represents changes I made to the Youtube embed code.
Let's take the following example. The code below is what I put in this post that embedded the Youtube video as full screen. Note that the black text is the original Youtube embed code with the exceptions of the width and height, the red text is what I added, and the green represents changes I made to the Youtube embed code.
|
<div style="padding-bottom:56.25%; position:relative; display:block; width: 100%">
<iframe width="100%" height="100%" src="https://www.youtube.com/embed/Mx6wf2KmRZU?si=M6YN1eXOZXckR1uy" title="YouTube video player" frameborder="0" allow="accelerometer; autoplay; clipboard-write; encrypted-media; gyroscope; picture-in-picture; web-share" allowfullscreen style="position:absolute; top:0; left: 0"></iframe> </div> |
To explain it step by step:
- I added this before the Youtube code: <div style="padding-bottom:56.25%; position:relative; display:block; width: 100%">
- Changed: width & height in the Youtube code to "100%":
- Added this before the </iframe>: style="position:absolute; top:0; left: 0">
- And put </div> after the </iframe>:
A signature that contains details about your truck is very helpful to those of us trying to help you. You don't want us guessing about your truck because we might give you the wrong info and cost you money. We don't want to do that either so we might not even try to help you for fear of getting it wrong.
So, let's create a signature. Here are the steps:
So, let's create a signature. Here are the steps:
|
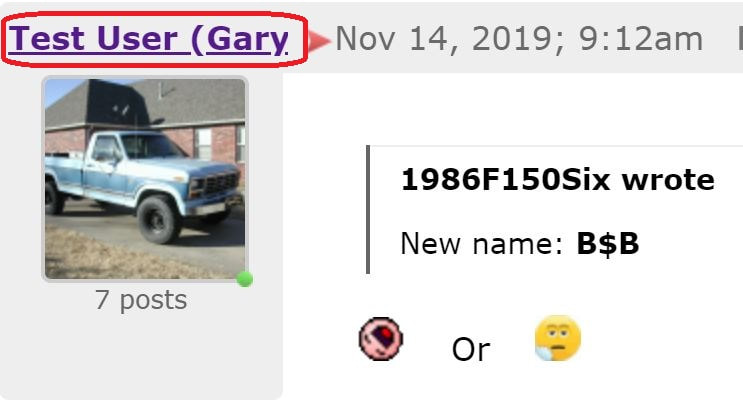
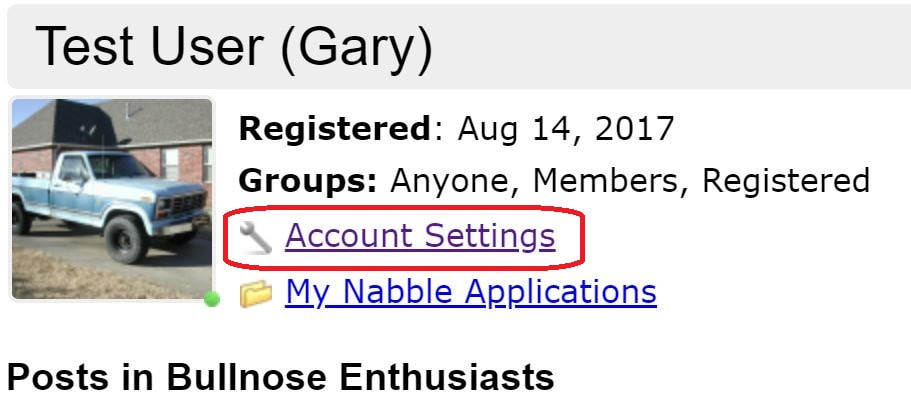
Step 1:
Click on your name just above your avatar. In the example to the right you'd click on "Test User (Gary. |
|
|
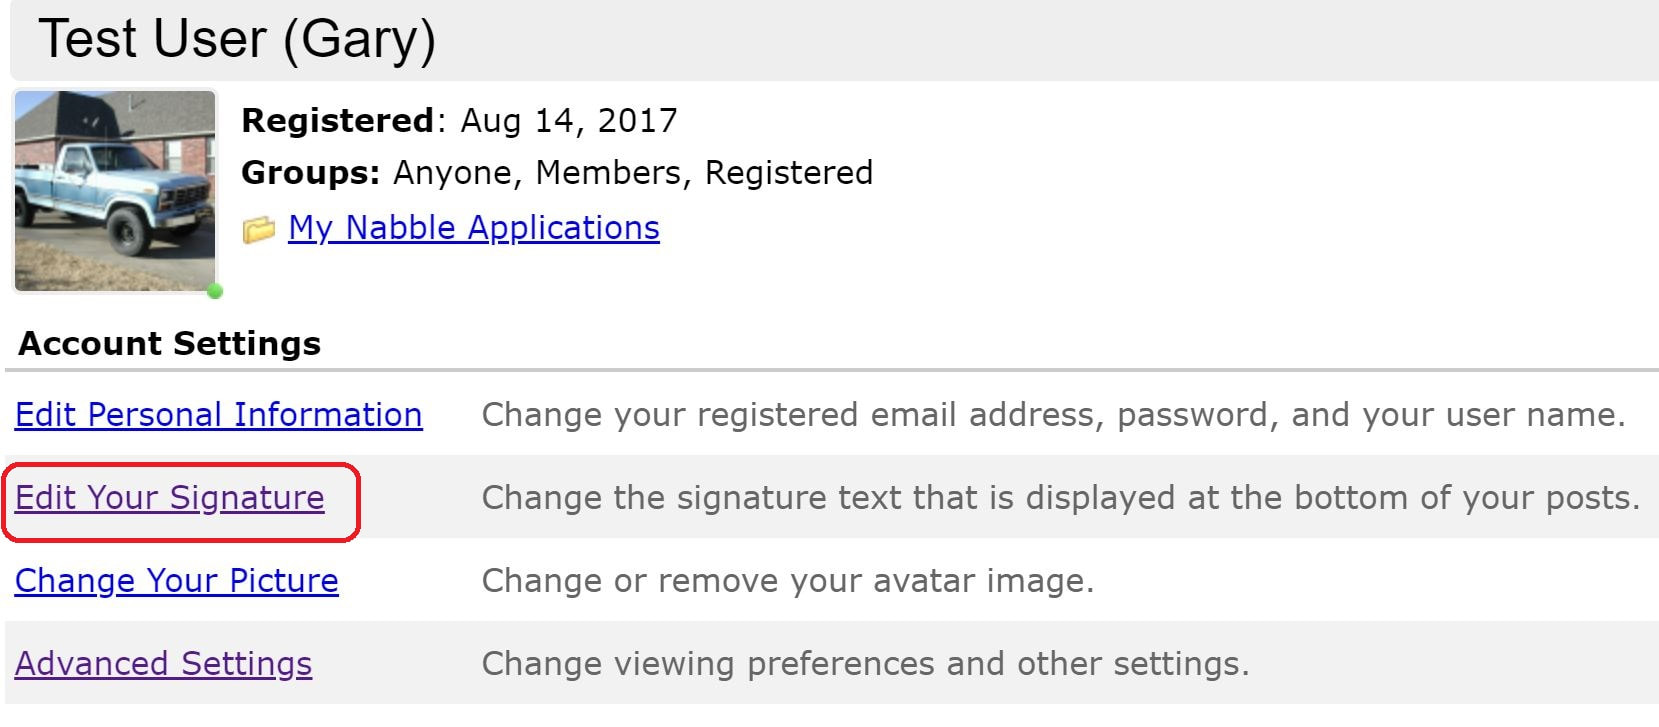
Step 2:
Click on Account Settings |
|
|
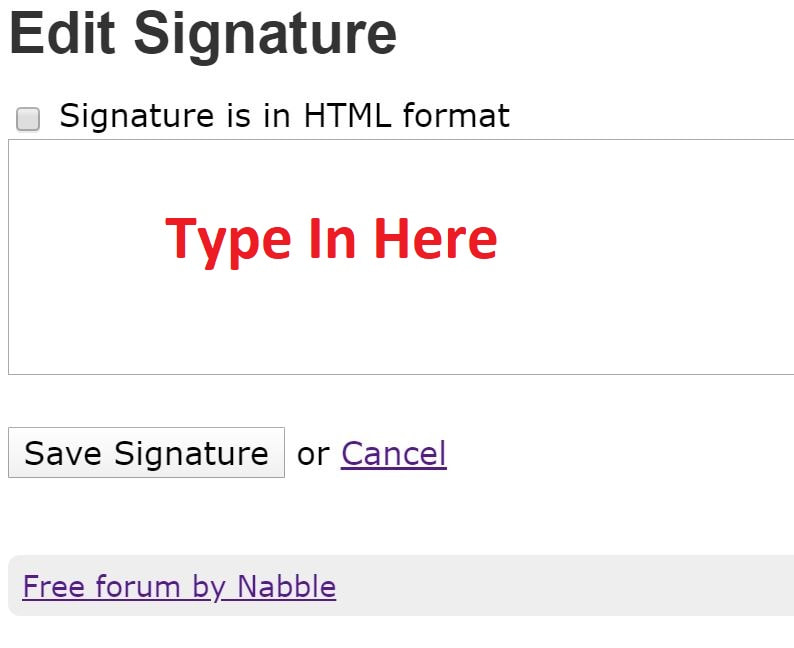
Step 3:
In Account Settings click on Edit Your Signature |
|
|
Step 4:
Now you can create or edit your signature. Type in the edit box, and do NOT forget to click Save Signature. |
|
|
But wait! There's more! What if you want to get fancy? See that Signature Is In HTML Format tick box? If you tick it you can play lots of games. To the right is what generates my signature. (You can click on the pic to the right and get a larger view.)
|

|